
It is to be measured in length to height. You measure every side with equal measure. This assists in the fit of the box to the product. Proper measuring prevents breakage, wastage, and ill-fitting.
In this guide, the steps are explained in a manner. It also describes the importance of taking the right measurements.
Size Accuracy That Protects and Fits Products
Proper box measurements are crucial for a lot of reasons. They assist in putting the products in the box without straining. This reduces the potential of bending or damage.
Smooth packing and stacking are also encouraged by proper measurements. Boxes of the right sizes appear to be well-balanced. Printing is easier if the dimensions are right.
There is improved utilization of storage space. Cargo transportation is made easier and more efficient. Measurement errors may result in waste and rework.
Proper dimensions save time in production. They also assist in consistency between the packaging styles. Measurement helps in improving performance at each level.
Know the Basic Box Dimensions
Understanding box dimensions helps avoid errors. Each dimension has a clear role. Learning them makes measuring easier. It also supports better design and box performance.
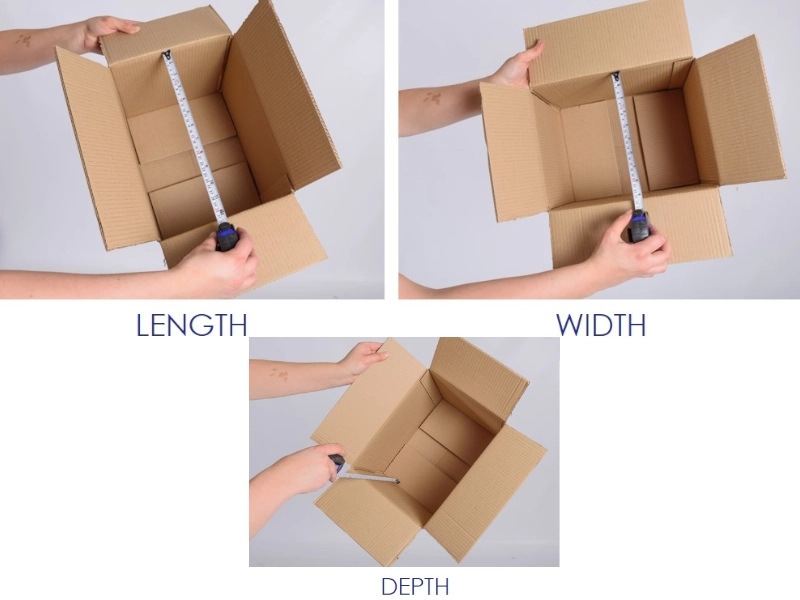
- Length
The biggest side of the box is called the length. The space of main products can be frequently located in this dimension. The adequate length holds the item in place.
The wrong fit may result in loose-fitting. This could influence fortification and general box stability during transport.
- Width
This is the front face to the back side. It determines the level of immersion of the product in the box. Adequate width ensures products can be held in position.
Excessive breadth will bring about movement. An excessively narrow width can press the product. The right width facilitates and allows a clean packing and simple closing of boxes.
- Height
It determines the height of the box to be used, measuring this side from the bottom to the top. Height will shield the product against top pressure.
Extra height can waste space. Height is short and can be a source of injury. Proper height makes the box stable and in good shape.
These dimensions were known, and so, the box was easy to measure. It also contributes to the prevention of confusion when packing and printing.
Understanding these dimensions makes the box measurement clear. It also helps avoid confusion during packing and printing.
Different Styles Depend on Dimensions
Box styles are linked to dimensions. Each style needs correct spacing. Size affects folding, closing, and overall structure.
- Width and Styles
Width affects how box flaps fold. Some styles need more side space. Narrow-width suits simple designs.
- Pillow Boxes
- Small Tuck-End Boxes
- Small Sleeve Boxes
- Cosmetic Sample Boxes
Wider boxes support inserts or layers like Auto Bottom Boxes and Window Display Boxes. The wrong width can stop proper folding. It may also affect box strength. Correct width allows styles to work as planned.
- Length and Styles
Length controls how the box opens and closes. Long boxes suit slide or sleeve styles. Short length works for tuck-end styles.
Incorrect length can cause weak closures. It may also affect product placement. Proper length supports smooth style function.
- Height and Styles
Height decides lid space and stacking ability. Tall styles need a stable height. Short styles suit flat packaging.
Extra height can weaken the structure. Less height may press the contents. Correct height keeps the style strong and easy to use.
Dimensions guide style choice. Correct sizing helps styles perform better and last longer.
Measure the Box from the Inside
Inside measurement shows usable space. It helps products fit well. This method is important for packing accuracy.
- Measure the inside width from front to back.
- Measure the inside height from base to top edge.
- Use the same unit for all sides.
Inside measuring reduces fitting issues. It helps plan product placement with care.
Measure the Box from the Outside
Outside measurement shows the total box size. It helps with storage and shipping planning.
- Close the box properly before measuring.
- Measure the outer length across the longest side.
- Measure the outer width from front to back.
- Measure the full outer height from base to top.
- Keep measurements straight and firm.
Outside measurements help manage space. They support stacking and transport needs.
Check the Box Depth Carefully
Box depth affects product safety. It controls how well items sit inside.
- Keep the measuring tool straight.
- Avoid pressing the box walls inward.
- Recheck to confirm accuracy.
Correct depth avoids movement inside the box. It helps protect items during handling.
Better Printing Results with Accurate Box Size
Accurate box size improves printing quality. Designs align better with the correct dimensions. Text stays readable and clear. Images fit the layout properly. Misaligned sizes can cause cutoffs.
This affects the final look. Correct dimensions support clean folds and sharp edges. Printing plates work more accurately. Color placement stays consistent. Overall appearance looks balanced.
Mistakes That Can Leave a Wrong Impact
Measuring errors can affect the box result. Knowing common mistakes helps avoid problems.
- Width Mistakes
Many people measure width from the wrong side. Some forget to check the inside space. Pressing the box can change the results.
Using mixed units also causes errors. Incorrect width affects folding and fit. Careful placement of the tool avoids these issues.
- Length Mistakes
Length is often confused with width. Measuring the shorter side by mistake is common. Skipping rechecks leads to errors.
Crooked tools give false results. Wrong length affects style and closure. Always confirm the longest side.
- Height Mistakes
Height is sometimes measured with the box open. This gives wrong results. Ignoring top flaps also causes issues.
Uneven surfaces change readings. Incorrect height affects stacking and safety. Measuring closed boxes helps accuracy.
Avoiding these mistakes saves time. It also improves overall box quality.
Steps to Take Box Measurements
It needs to keep all the above factors in mind, and then you should follow these steps to create an accurate packaging or box.
- Decide the Product Size
Measure the accurate size of the product first. This ensures the box will fit properly.
- Add Extra Space
Include a little extra space for padding or protective inserts. This prevents the product from being too tight.
- Measure Dimensions
Measure the longest side of the product. This will be the box’s length. Take the accurate dimensions of the side from front to back.
This determines the box width. Measure it from bottom to top. This will be the box height.
- Consider Flaps and Closures
Add space for flaps or lids according to the box style.
Recheck all dimensions to ensure accuracy before making the box. Write down the final record. Keep it ready for production.
Conclusion
Every side has to be measured in a distinct order. The results remain accurate when using the same unit.
Proper measurement helps in enhanced fitting and guarding. It also enhances printing and box designs. These are easy measures to take in order to prevent mistakes.
Proper packing will be achieved because of careful measuring. An easy and reliable process is achieved by a clear understanding.
